
Demand-Controlled LED Matrix Showcases GIF Images Instantaneously
Chillaxin' with GIF-tastic RGB LED Matrix
Got a fancy LED matrix setup, but unsure what to do with it? Well, check out [panjanek]'s ingenious solution – an RGB LED matrix that blasts all the GIFs your mates can throw at it! Ya, you heard that right!
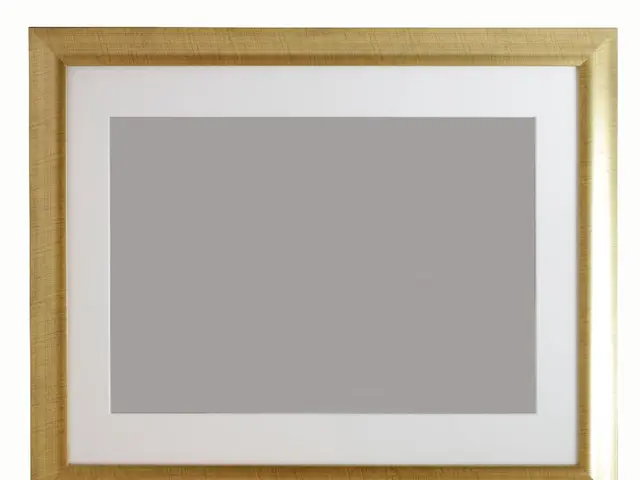
[panjanek] takes WS2812B addressable LEDs and chunks 'em together to make a 32 x 32 matrix, which snugly fits inside an Ikea picture frame. The badass ensemble connects to an ESP8266 microcontroller, acting as the Matrix's very own brain, complete with Wi-Fi connections and a user-friendly web interface. So, open up the interface, upload your favorite GIFs, and watch 'em light up like a rave on your matrix!
Looking for real-time action? Stream UDP packets of bitmap data over a network to get your GIFs on, pronto!
It's a wicked build, and the perfect answer to that endless LED matrix debate. Interested in giving it a whirl? The code's on Github, so feel free to snoop around and snag the goodies for your LED creations. We've been exploring some left-field LED matrix projects lately, like this sick M.2 slot device. Got your own LED masterpiece in the making? Don't forget to let us know – hit the tipsline and spill the beans!
Now, if you're keen on recreating the madness, here's a lowdown on the necessary components and steps:
Gear Up
- WS2812B Addressable RGB LEDs: These gems assemble into a matrix. For instance, [panjanek] opted for a 32 x 32 configuration.
- ESP8266 Microcontroller: This Wi-Fi whiz-kid is the brains behind the operation, offering connectivity and web interface capabilities.
- Power Supply: Ensure it can manage the total power drawn by your LED matrix.
- Jumper Wires and Breadboard: These are for connecting the LEDs to the microcontroller.
- Computer or Smartphone: Required for creating and uploading GIFs.
Zero to Hero
Assemble the LED Matrix
- Shoeshine 'Em: Lay out the WS2812B LEDs in a snazzy matrix pattern.
- Wire 'Em Up: Connect the LEDs in a zigzag pattern, ensuring each LED's data pin is hooked up to the next one in the matrix.
Connect the LEDs to the ESP8266
- Data Pin Bondage: Attach the data pin of the initial LED to a digital pin on the ESP8266 (e.g., D5).
- Power Connections: Link the VCC and GND pins of the LEDs to the power pins on the ESP8266 or a separate power supply.
Craft the Web Interface and Control System
- ESP8266 Web Interface: Use libraries like ESPUI or ESPAsyncWebServer to create a web interface on the ESP8266.
- Upload GIFs: Cook up functionality to upload GIFs via the web interface, converting them into a format the ESP8266 groks (e.g., bitmap data).
- Animate Right: Allow users to control animations (e.g., start, stop, change speed) through the web interface.
Activate GIF Display Logic
- GIF Parsing: Script a function to parse GIFs into frame data.
- Matrix Dazzle: Use a library like FastLED to display each frame of the GIF on the LED matrix.
Here's a lil' snippet for ESP8266 inspiration:
```cpp
// Define the LED pin and number of LEDs
// Define the LED stripCRGB leds[NUM_LEDS];
// ESP8266 Web ServerAsyncWebServer server(80);
void setup() { Serial.begin(115200);
// Initialize LEDs FastLED.addLeds
// Connect to WiFi WiFi.begin("SSID", "PASSWORD");
// Set up the web server server.on("/", HTTP_GET, { request->send(200, "text/html", "
"); });
server.on("/upload", HTTP_POST, { request->send(200, "text/plain", "GIF uploaded successfully"); // Handle GIF upload logic here });
server.begin();}
void loop() { // Handle animations here // Example: Display a GIF // for(int frame = 0; frame < num_frames; frame++) { // display_frame(frame); // delay(50); // Adjust delay based on animation speed // }}```
- To create a data-and-cloud-computing-enabled RGB LED matrix similar to the one described, you'll require WS2812B Addressable RGB LEDs, an ESP8266 microcontroller, and a suitable power supply.
- After assembling the LED matrix, connecting it to the ESP8266, and building a web interface, you can stream UDP packets of bitmap data over a network to showcase your favorite GIFs in real-time, making use of technology and data streaming capabilities.


